
© Original recipe by Fork & Flourish ©
🥖🧄 Fluffy Garlic Rolls Delicious Side Dish 🥖🧄
1. Introduction
If you’re searching for the perfect garlic bread side dish to elevate your dinner, look no further than these garlic rolls recipe. These fluffy bread rolls, infused with fragrant garlic and butter, melt in your mouth and bring warmth and comfort to any meal. Whether you serve them alongside pasta, roasted meats, or holiday feasts, they are bound to become a family favorite. Today, we’ll guide you through every step to creating irresistibly soft, aromatic garlic rolls that are sure to impress.
2. Why You’ll Love This Recipe
- Ready in 30 minutes – Perfect for busy weeknights or last-minute gatherings.
- Delicately fluffy texture that melts in your mouth.
- Rich garlic and buttery flavor that enhances any dish.
- Simple ingredients with professional results even for beginners.
3. Ingredient Notes
Creating these fluffy bread rolls begins with selecting high-quality ingredients. For the best flavor, opt for fresh garlic and real butter. The garlic should be aromatic and firm, not dried out or bitter. Use bread flour for better gluten development, which results in fluffier, more elastic rolls. A good-quality yeast ensures your dough rises beautifully and keeps its soft texture. You can also experiment with organic or locally sourced ingredients to elevate the overall taste and aroma of your garlic rolls.
4. Kitchen Tools You Need
To achieve bakery-quality garlic rolls at home, you’ll want reliable and efficient tools. Check out this Compact 6-in-1 Digital Air Fryer for quick baking or reheating leftovers; it keeps the rolls crispy on the outside and tender inside. A durable T-fal 14-Piece Hard Anodized Nonstick Cookware Set makes kneading and baking a breeze. For mixing and dough preparation, the KitchenAid Artisan 5-Quart Stand Mixer ensures even mixing and saves time. Investing in quality tools will make your baking journey more enjoyable and successful.
5. How to Make Fluffy Garlic Rolls
Prepare the Dough
Start by dissolving active dry yeast in warm water (about 110°F) with a pinch of sugar. Let it activate until frothy, about 5 minutes. Meanwhile, in a large mixing bowl, combine bread flour, sugar, and a teaspoon of salt. Once the yeast is bubbly, add melted butter and a beaten egg, then pour into the dry ingredients. Knead the dough until elastic, soft, and slightly sticky—this should take about 8-10 minutes with a stand mixer or by hand. Cover with a damp towel and let it rise in a warm spot until doubled in size, approximately 1 hour. Your kitchen will fill with a pleasant yeasty aroma.)
Shape and Flavor the Rolls
Gently punch down the dough and divide it into equal portions. Roll each piece into a smooth ball, then place them on a greased baking sheet. To infuse garlic flavor, mix minced garlic with melted butter and brush generously over the rolls before the final proofing. Cover and let rise until puffed and almost doubled, around 30 minutes. During this time, the aroma of garlic and butter will intensify.
Bake and Serve
Preheat your oven to 375°F (190°C). Bake the rolls for 15-18 minutes or until golden brown and fragrant. The tops should be crispy with soft, fluffy insides. Remove from oven, brush with more garlic butter if desired, and serve warm. The result: perfectly fluffy garlic rolls that are crispy on the outside and tender within, soaked in aromatic garlic butter.
6. Expert Tips for Success
- Ensure your yeast is fresh for optimal rising. Check expiration dates before use.
- Use room temperature ingredients to promote even yeast activation and dough consistency.
- Don’t overproof—let the dough double in size but not beyond that, to keep the rolls fluffy.
- Brush with garlic butter multiple times during baking for a rich, flavorful crust.
- For extra flavor, sprinkle chopped parsley or grated Parmesan on top before baking.
7. Variations & Substitutions
If you’re looking to customize these garlic bread side dishes, try adding shredded cheese like mozzarella or Parmesan into the dough for cheesy garlic rolls. For a vegan version, substitute dairy butter with vegan margarine and use plant-based milk. To make them gluten-free, opt for a high-quality gluten-free flour blend, but note that texture may vary slightly.
8. Storage & Reheating
Leftover garlic rolls can be stored in an airtight container at room temperature for up to 2 days or refrigerated for longer freshness. To reheat, place them in a preheated oven at 350°F for 10 minutes or warm in the air fryer for a quick, crispy finish. For best taste, reheat promptly to enjoy their warm, fluffy texture and fragrant aroma.
9. FAQ
Can I freeze leftover garlic rolls?
Yes, wrap them tightly in plastic wrap or foil and freeze for up to 3 months. Reheat in the oven or air fryer for best results.
How do I achieve extra fluffiness in the rolls?
Ensure proper kneading, use fresh yeast, and allow ample rising time. A warm environment during proofing also encourages a soft, airy texture.
What if I don’t have bread flour?
You can substitute all-purpose flour, but your rolls might be slightly denser. For the best fluffy texture, bread flour is recommended.
Can I add other herbs or spices?
Absolutely! Incorporate herbs like rosemary, thyme, or parsley into the dough for extra flavor layers. Spices such as crushed red pepper flakes can add a mild heat.
10. Conclusion
With their irresistible aroma, fluffy texture, and savory garlic flavor, these garlic rolls are the ultimate side dish for any meal. Simple to make yet impressive, they add a Homemade touch that everyone will appreciate. Whether you’re preparing a cozy family dinner or hosting a gathering, these garlic bread rolls will undoubtedly steal the show. Happy baking!
Print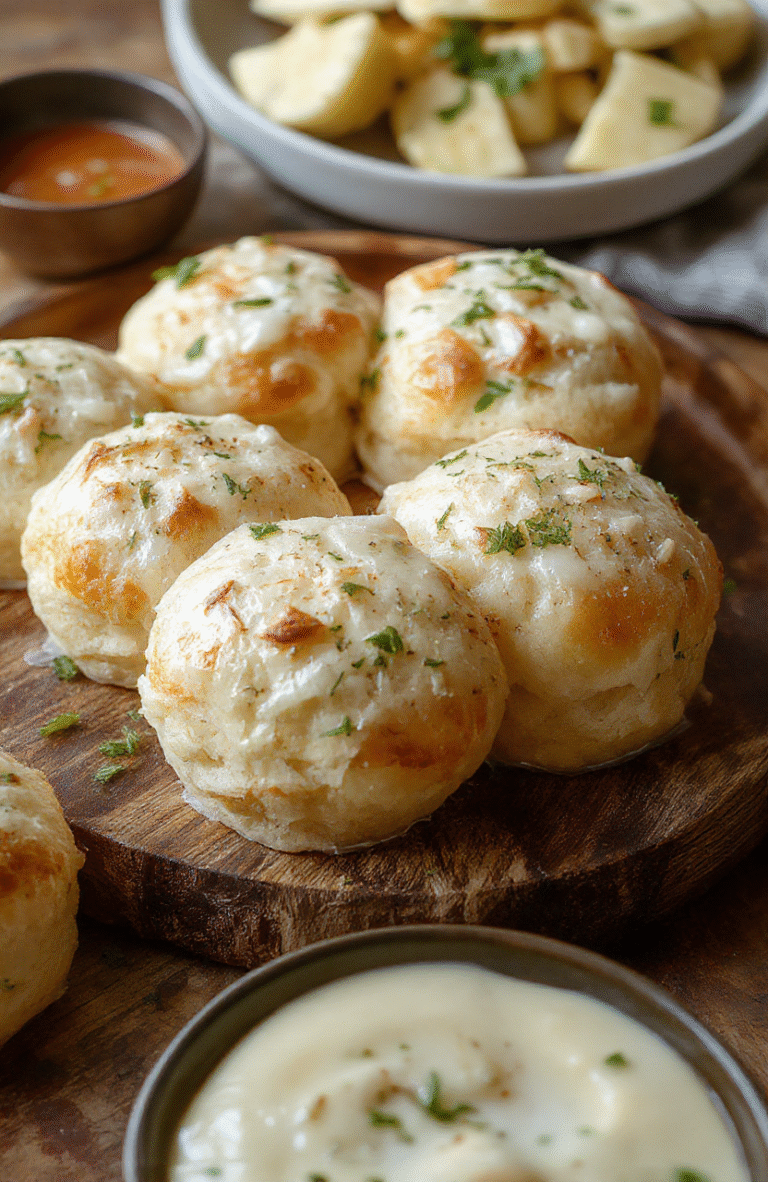
Fluffy Garlic Rolls Delicious Side Dish
Soft, airy garlic rolls perfect as a side for dinner or special occasions.
- Total Time: 1 hour 35 minutes
- Yield: 12 rolls
Ingredients
- 2 ½ cups all-purpose flour
- 1 packet active dry yeast
- 1 cup warm milk
- ¼ cup unsalted butter, melted
- 2 teaspoons sugar
- 1 teaspoon salt
- 4 garlic cloves, minced
- 2 tablespoons chopped fresh parsley
Instructions
- In a bowl, combine warm milk, sugar, and yeast. Let sit until frothy.
- Add melted butter, salt, and gradually mix in flour until a soft dough forms.
- Knead the dough until smooth and elastic, about 5-7 minutes.
- Cover and let rise in a warm place until doubled, about 1 hour.
- Preheat oven to 375°F (190°C). Punch down dough and shape into small rolls.
- Place rolls on a baking sheet lined with parchment paper.
- Mix minced garlic with melted butter and brush over the rolls.
- Bake for 15-20 minutes until golden brown.
- Garnish with chopped parsley before serving.
Notes
- For extra flavor, add grated Parmesan cheese to the dough or garlic butter.
- These rolls are best served warm and fresh but can be reheated.
- Prep Time: 15 minutes
- Cook Time: 20 minutes
- Method: Bake, Yeast dough
- Cuisine: American
- Diet: Vegetarian
Nutrition
- Serving Size: 1 roll (about 50g)
- Calories: 150 Kcal
- Sugar: 2g
- Sodium: 150mg
- Fat: 8g
- Saturated Fat: 5g
- Unsaturated Fat: 3g
- Trans Fat: 0g
- Carbohydrates: 18g
- Fiber: 1g
- Protein: 4g
- Cholesterol: 15mg
