
Fried Chicken Katsu with Panko – Golden & Crunchy Goodness 🍗✨🔥
1. Introduction
There’s something magical about the perfect crunch of Fried Chicken Katsu with Panko breadcrumbs. This Japanese-inspired dish has taken the culinary world by storm, and for good reason! The contrast between the golden, crispy exterior and the juicy, tender chicken inside creates a textural experience that’s simply irresistible. Whether you’re serving it with traditional tonkatsu sauce, a fresh bed of shredded cabbage, or over steaming white rice, this fried chicken katsu recipe will quickly become a staple in your recipe collection.
What makes this dish truly special is the use of Panko breadcrumbs, which create an airier, crispier coating than regular breadcrumbs. The technique of pounding the chicken ensures even cooking and maximum tenderness in every bite. Perfect for weeknight dinners or when you want to impress guests, this recipe delivers restaurant-quality results right in your own kitchen.
2. Ingredients
Gathering the right ingredients is the first step to creating perfect Fried Chicken Katsu. Here’s what you’ll need:
- 2 boneless, skinless chicken breasts (about 6-8 oz each)
- 1 cup all-purpose flour (for that essential first coating layer)
- 2 large eggs, beaten (creates the “glue” for the breadcrumbs)
- 1 ½ cups Panko breadcrumbs (the secret to that signature crunch)
- 1 tsp salt (enhances all the flavors)
- ½ tsp black pepper (adds subtle heat)
- ½ tsp garlic powder (for depth of flavor)
- Vegetable oil for frying (about 1-2 cups, depending on pan size)
- Tonkatsu sauce (for serving – available in Asian markets or make your own)
- Shredded cabbage (optional, for serving – provides a fresh contrast)
For those who love exploring different flavors, you might enjoy pairing this with some sweet treats like our Butterbeer Cookies or Millionaire Brownies for dessert!
3. Step-by-Step Instructions
Step 1: Prepare the Chicken
Begin by placing the chicken breasts between two sheets of plastic wrap or parchment paper. Using a meat mallet or the bottom of a heavy pan, gently pound them to an even thickness of about ½ inch. This crucial step serves two purposes: it tenderizes the meat by breaking down the fibers, and ensures even cooking so you don’t end up with dry edges and undercooked centers. If you don’t have a mallet, a rolling pin or even a heavy can will work in a pinch!
Pro tip: Start from the center and work outward, using controlled, even strokes. This prevents tearing the meat while achieving that perfect, uniform thickness.

Step 2: Coat with Flour and Egg
Season the chicken breasts generously with salt, pepper, and garlic powder on both sides. The seasoning at this stage is important as it flavors the meat itself, not just the coating. Set up your breading station with three shallow dishes: one with flour, one with beaten eggs, and one with Panko breadcrumbs.
Dredge each chicken piece in flour, shaking off any excess. The flour creates a dry surface that helps the egg wash adhere better. Next, dip the floured chicken into the beaten eggs, making sure it’s fully coated. Let any excess egg drip off before moving to the next step. This egg wash is what will make the Panko stick, creating that beautiful, crunchy coating we’re after.

Step 3: Bread with Panko
Now for the star of the show – the Panko breadcrumbs! Press the egg-coated chicken firmly into the Panko, coating both sides evenly. For extra crispiness, press lightly to help the crumbs adhere better. You might want to use one hand for dry ingredients and one for wet to keep your fingers from getting too messy.
Here’s a professional chef’s trick: After the initial coating, let the breaded chicken rest for about 5 minutes. This allows the coating to set and reduces the chance of the breading falling off during frying. If you’re looking for more snack inspiration, this technique works great for other fried foods too!

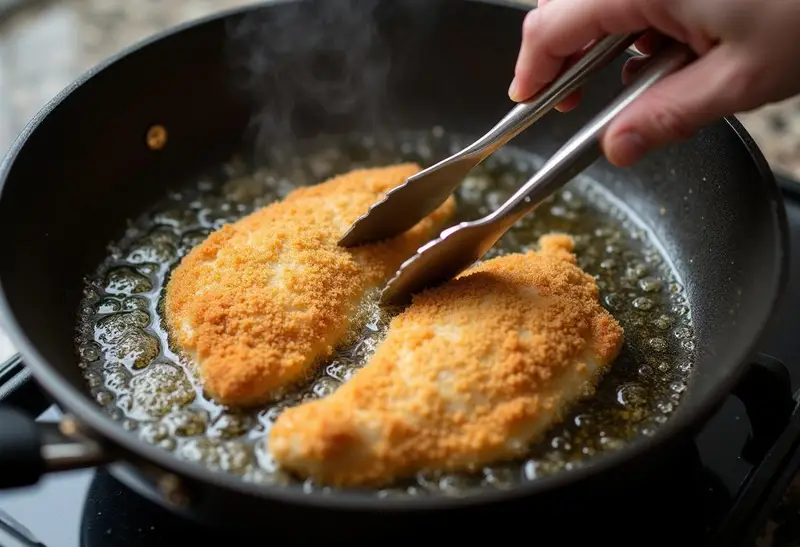
Step 4: Fry to Golden Perfection
Heat about ½ inch of vegetable oil in a heavy-bottomed skillet or Dutch oven over medium-high heat until it reaches 350°F (175°C). If you don’t have a thermometer, test the oil by dropping in a small piece of breadcrumb – it should sizzle immediately but not burn. Carefully add the breaded chicken to the hot oil, being careful not to overcrowd the pan (this lowers the oil temperature and makes the chicken greasy).
Fry for 4-5 minutes per side until the coating is a deep golden brown and the internal temperature reaches 165°F (74°C). Use tongs to flip the chicken gently to avoid splashing hot oil. Once cooked, transfer to a wire rack set over a baking sheet or paper towels to drain. This keeps the bottom from getting soggy as it cools. For more cooking techniques, check out this external resource on chicken katsu variations.
4. Serving Suggestions
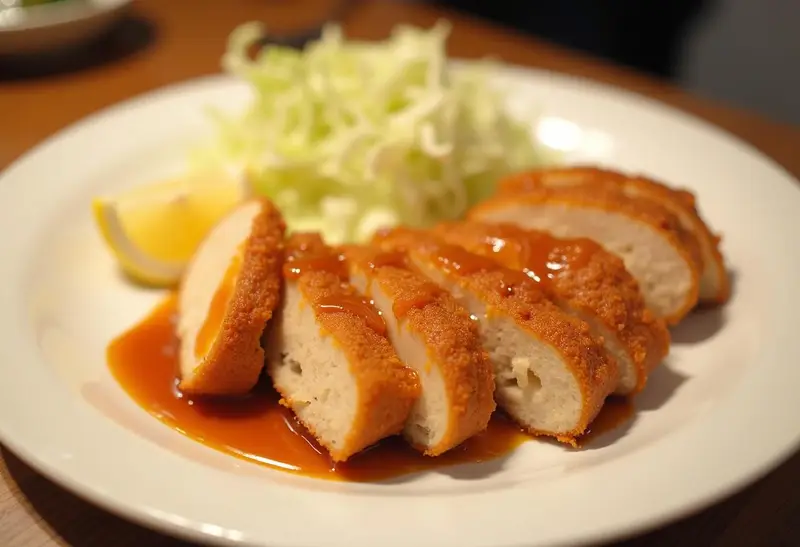
The beauty of Fried Chicken Katsu with Panko lies in its versatility. For a traditional presentation, slice the katsu into strips and serve with tonkatsu sauce (a sweet and tangy Japanese barbecue sauce) and a mound of finely shredded cabbage. The crisp, fresh cabbage provides a wonderful contrast to the rich, fried chicken.
For a heartier meal, serve over steamed Japanese short-grain rice with a side of miso soup. You can also get creative with sandwiches – place a katsu cutlet between two slices of soft white bread with tonkatsu sauce and shredded cabbage for a delicious katsu sando (Japanese sandwich). If you’re serving this for breakfast, try it with a soft-boiled egg for a protein-packed start to your day!
5. Tips for the Best Fried Chicken Katsu
- Fresh Panko is key: Older Panko loses its ability to create that signature light, crispy texture. Look for unopened packages with a recent expiration date.
- Oil temperature matters: Use a thermometer to maintain 350°F (175°C). Too hot and the outside burns before the inside cooks; too cool and the chicken absorbs too much oil.
- Rest before slicing: Let the chicken rest for 3-5 minutes after frying to allow the juices to redistribute throughout the meat.
- Double-dip for extra crunch: For an even thicker crust, repeat the egg and Panko coating process a second time.
- Drain properly: Use a wire rack instead of paper towels to prevent steam from making the bottom soggy.
6. Variations
While chicken katsu is delicious as-is, there are countless ways to put your own spin on this classic:
- Tonkatsu variation: Substitute pork cutlets for chicken for the traditional Japanese tonkatsu.
- Spicy kick: Add ½ teaspoon cayenne pepper to the flour mixture or mix some sriracha into the egg wash.
- Healthier option: Bake at 400°F (200°C) for 20-25 minutes, flipping halfway, for a lighter version. Spray with oil before baking to help browning.
- Cheese-stuffed: Make a pocket in the chicken and stuff with mozzarella before breading for a gooey surprise.
- Katsu curry: Serve with Japanese curry sauce for a popular restaurant-style dish.
If you enjoy experimenting with flavors, you might also love our White Chocolate Cranberry Pecan Clusters or Easter Crack for sweet variations on classic recipes.
7. Storage & Reheating
While Fried Chicken Katsu with Panko is best enjoyed fresh, leftovers can be stored in an airtight container in the refrigerator for up to 3 days. To reheat:
- Oven method: Place on a baking sheet and heat at 350°F (175°C) for 10-12 minutes until heated through and crispy.
- Air fryer: Reheat at 350°F (175°C) for 5-7 minutes, flipping halfway.
- Microwave (last resort): Microwave briefly to warm, then finish in a toaster oven to crisp up the coating.
Note: Freezing is possible but may affect the texture of the Panko coating. If freezing, reheat directly from frozen in a 350°F (175°C) oven for 15-20 minutes.
8. FAQs
Q: Can I use regular breadcrumbs instead of Panko?
A: While regular breadcrumbs will work, they create a denser, less crispy coating. Panko’s larger, flakier crumbs are what give katsu its signature light, airy crunch. If you must substitute, try crushing cornflakes for a similar texture.
Q: How do I know the oil is hot enough without a thermometer?
A: The wooden spoon test works well – dip the handle of a wooden spoon into the oil. If bubbles form around it steadily, the oil is ready. Alternatively, a small piece of bread or a breadcrumb should sizzle vigorously when added.
Q: Can I make this gluten-free?
A: Absolutely! Use gluten-free flour and gluten-free Panko breadcrumbs (available in many specialty stores). Ensure your tonkatsu sauce is also gluten-free or make your own.
Q: What’s the best oil for frying katsu?
A: Neutral oils with high smoke points work best – vegetable, canola, or peanut oil are all excellent choices. Avoid olive oil as its flavor is too strong and its smoke point too low for proper frying.
Q: Can I prepare katsu ahead of time?
A: You can bread the chicken up to 4 hours ahead and keep it refrigerated until ready to fry. For longer prep, freeze the breaded chicken raw, then fry directly from frozen (adding a couple minutes to cooking time).
9. Conclusion
Mastering Fried Chicken Katsu with Panko is a game-changer for any home cook. This recipe delivers that perfect combination of shatteringly crisp exterior and juicy, flavorful chicken that makes katsu so addictive. Whether you’re serving it as part of a Japanese-inspired meal, in a sandwich, or alongside some Lucky Charms Ice Cream Sundae for a fun contrast, it’s sure to impress.
The techniques you learn here – proper pounding, breading, and frying – translate to many other dishes in your culinary repertoire. Once you’ve perfected the basic recipe, don’t be afraid to experiment with different seasonings, sauces, and presentations. That’s the joy of cooking!
If you have any questions about this recipe or want to share your katsu creations, we’d love to hear from you via our contact page. Happy cooking, and enjoy that golden, crunchy goodness!
Print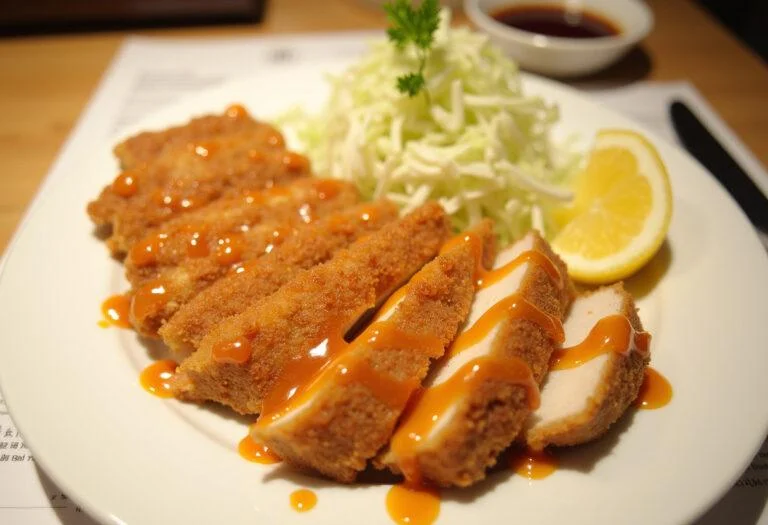
Fried Chicken Katsu with Panko – Golden & Crunchy Goodness
Fried Chicken Katsu with Panko is a Japanese-inspired dish that delivers an irresistible crunch with every bite. The golden, crispy exterior paired with juicy, tender chicken makes this dish a crowd-pleaser. Whether served with tonkatsu sauce, shredded cabbage, or over a bed of rice, this fried chicken katsu recipe is sure to become a favorite in your kitchen.
- Total Time: 25 minutes
- Yield: 2 servings
Ingredients
- 2 boneless, skinless chicken breasts
- 1 cup all-purpose flour
- 2 large eggs, beaten
- 1 ½ cups Panko breadcrumbs
- 1 tsp salt
- ½ tsp black pepper
- ½ tsp garlic powder
- Vegetable oil for frying
- Tonkatsu sauce (for serving)
- Shredded cabbage (optional, for serving)
Instructions
- Place the chicken breasts between two sheets of plastic wrap or parchment paper. Using a meat mallet or rolling pin, pound them to an even thickness of about ½ inch. This ensures even cooking and tender meat.
- Season the chicken with salt, pepper, and garlic powder. Dredge each piece in flour, shaking off excess. Dip into the beaten eggs, ensuring full coverage.
- Press the chicken firmly into the Panko breadcrumbs, coating both sides evenly. For extra crispiness, press lightly to help the crumbs adhere.
- Heat oil in a deep pan or skillet to 350°F (175°C). Fry the chicken for 4-5 minutes per side until golden brown and cooked through. Drain on a wire rack or paper towels.
- Serve your Fried Chicken Katsu with Panko hot, drizzled with tonkatsu sauce and accompanied by shredded cabbage or steamed rice. A squeeze of lemon adds a refreshing touch!
Notes
- Use fresh Panko breadcrumbs for maximum crispiness.
- Maintain oil temperature for even frying.
- Let the chicken rest for a few minutes before slicing to retain juices.
- Try pork cutlets (Tonkatsu) for a traditional twist.
- Add a pinch of cayenne to the flour for a spicy kick.
- Bake instead of frying for a lighter version (400°F for 20-25 minutes).
- Prep Time: 15 minutes
- Cook Time: 10 minutes
- Category: Main Course
- Method: Frying
- Cuisine: Japanese
Nutrition
- Serving Size: 1 chicken breast
- Calories: 450 Kcal
- Sugar: 2g
- Sodium: 800mg
- Fat: 20g
- Saturated Fat: 4g
- Unsaturated Fat: 12g
- Trans Fat: 0g
- Carbohydrates: 35g
- Fiber: 2g
- Protein: 35g
- Cholesterol: 180mg
