
🍓 No-Bake Cheesecake Strawberries: A Juicy, Creamy, Effortless Sweet Treat!
1. Introduction
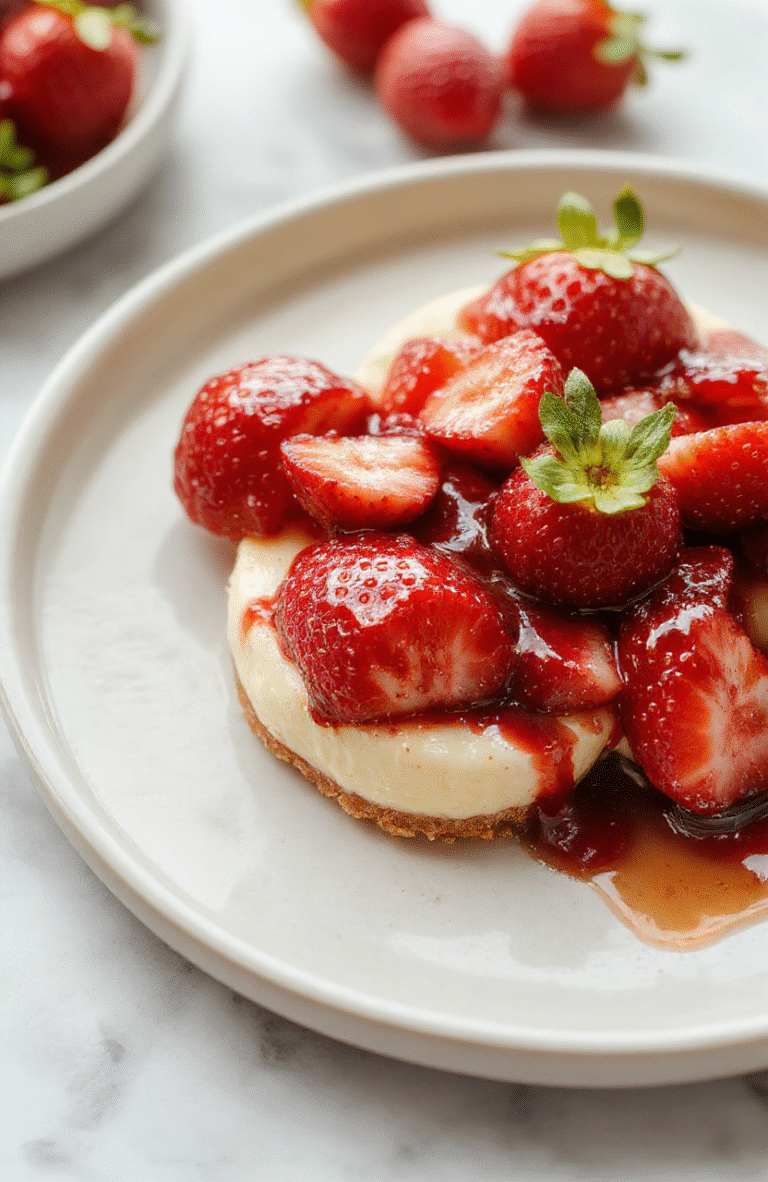
Imagine biting into a plump, ripe strawberry and discovering a cool, creamy no-bake cheesecake center wrapped in a delicate graham crisp crust. That’s exactly what these no-bake cheesecake strawberries deliver—bursting with fresh fruit flavor, a hint of lemon brightness, and the rich, smooth texture of classic cheesecake… all without turning on your oven. Whether you’re scrambling for a last-minute party dessert or simply craving something light yet indulgent, these tiny masterpieces come together in under 20 minutes of hands-on time and 2 hours in the freezer. No fancy skills required—just fresh ingredients and a little love.
2. Why You’ll Love This Recipe
- Ready in under 30 minutes—no waiting for oven preheat or cake cooling. Perfect for spontaneous cravings!
- Zero baking required—ideal for hot summer days or kitchens without an oven.
- One-pan (or even no-pan!) prep—just a little whisking, a bit of piping, and a quick freeze.
- Gluten-free adaptable—swap graham crackers for almond flour cookies and enjoy!
- Budget-friendly & satisfying—a bakery-worthy dessert that costs pennies per bite.
3. Ingredient Notes
Every component of these strawberries plays a vital role—not just flavor, but structure and texture. Let’s break it down:
- Fresh strawberries: Pick firm, glossy, deeply red berries with fresh green caps. Overly soft strawberries will leak and compromise the texture. If they’re small (under 2 inches), you may need to halve them lengthwise instead of hollowing—work them carefully for a stable base.
- Graham crackers: The classic choice for that buttery, slightly sweet crunch. For a deeper flavor, try gingersnap or speculoos crumbs. Ensure they’re finely crushed—no one wants gritty chunks disrupting the creamy center.
- Heavy cream cheese: Full-fat is non-negotiable here. Low-fat versions can make the filling grainy or unstable. Let it come to room temperature for smooth blending—no lumps!
- Confectioners’ sugar: Not just for sweetness—it stabilizes the whipped cream and prevents weeping. Sift it to avoid graininess.
- Vanilla extract & lemon zest: These are the unsung heroes. A touch of vanilla rounds out sweetness, while lemon adds the signature cheesecake tang that balances the berry’s natural juice.
- Heavy whipping cream (cold): Whipped separately for airiness and structure. Under-whipped = soupy filling; over-whipped = gritty texture. Aim for stiff peaks but don’t overdo it.
4. Kitchen Tools You Need
You probably own most of these, but having the right tools makes all the difference—especially when working with delicate fillings. These picks are tested for precision, durability, and ease of cleanup:
The Deluxe 33-Piece Silicone Utensil Set includes a fine-mesh sieve perfect for sifting confectioners’ sugar and a small offset spatula ideal for smoothing filling into piping bags. Its heat-resistant silicone won’t scratch your bowls or strawberries.
For clean, consistent hollowing, I swear by the Fullstar Ultimate Veggie Prep Master. Its strawberry corer is sharp enough to cleanly remove the core without splitting the berry—plus, it doubles as an easy melon baller for garnish.
If you’re making a big batch (say, for a party), the Ninja Mega Kitchen Power System whips cream and crushes crackers in seconds with its powerful pulse function. No more arm fatigue or uneven crumbs!
Once your strawberries are assembled, store them in the JoyJolt Airtight Glass Food Storage Set. The glass is non-porous, so no odors seep in, and the leak-proof lids keep frostbite at bay.
5. How to Make No-Bake Cheesecake Strawberries
Phase 1: Prep & Hollow the Strawberries
Wash and pat strawberries *completely* dry—water is the enemy of delicate fillings. Trim the green stem, then use a small paring knife or the corer from your veggie prep tool to gently hollow out the center, forming a narrow cavity. Reserve the removed core for garnish or snacking. Place hollowed strawberries upright in a muffin tin or on a parchment-lined tray. Why? This stabilizes them while filling and prevents tipping.
Phase 2: Make the Cheesecake Filling
In a medium bowl, beat room-temperature cream cheese until * silky*—no lumps! Add confectioners’ sugar, vanilla, and lemon zest; beat another minute until smooth and pale. In a separate bowl, whip cold heavy cream to stiff peaks. Gently fold one-third of the whipped cream into the cream cheese mixture to lighten it—then carefully incorporate the rest. Stop as soon as it’s blended; overmixing deflates the air.
Phase 3: Assemble & Chill
Transfer filling to a piping bag fitted with a star tip (or a zip-top bag with a corner snipped). Pipe the mixture evenly into each strawberry, filling to just below the rim. For an elegant finish, dust with a light sprinkle of crushed graham crackers and a tiny dusting of powdered sugar. Chill in the fridge for 30 minutes to set, then transfer to the freezer for 1 hour. This flash-freeze locks in shape for clean slicing and serving.
Visual Cues You’re Done
When ready, the strawberries should bounce back slightly when gently pressed—no indent, no sag. The filling will have a firm-but-giving texture, like chilled tiramisu. If they feel mushy, give them 15 more minutes in the freezer.
6. Expert Tips for Success
I’ve made—and ruined—dozens of batches to refine this method. Here’s what saves time and stress:
- Keep ingredients cold except cream cheese. Room-temp cream cheese mixes smoothly, but *everything* else—bowl, beaters, cream—must be ice-cold for stable whipping.
- Use a mesh sieve over your piping bag. It catches stray graham bits and ensures a flawless flow.
- Don’t overfill. Leave 1/4 inch space at the top. As the filling thaws, it settles slightly—overfilled berries overflow onto your serving plate.
- Assemble no more than 4 hours ahead. Beyond that, condensation forms inside the berries, making them soggy. For events, prep the filling and hollow berries in advance; fill just before serving.
- Dip the knife in hot water before trimming caps. This gives clean cuts on the berries, and the caps can be diced for a garnish salad or mixed into yogurt.
7. Variations & Substitutions
Customize these to suit your pantry or Dietary needs without sacrificing magic:
- Sugar-free: Swap confectioners’ sugar for 2 tbsp erythritol blend + 1/4 tsp stevia. Use sugar-free graham crackers.
- Dairy-free: Use full-fat canned coconut cream (chilled overnight) for whipped base + vegan cream cheese (Kite Hill or Miyoko’s).
- Flavor twists:
- Berry Swirl: Fold 2 tbsp crushed freeze-dried raspberries into the filling.
- Lemon-Zest Boost: Add extra zest from 1/2 lemon + a tiny splash of lemon juice (stop at 1 tsp—too much can curdle cream cheese).
- Chocolate-Covered: Melt dark chocolate gently (double boiler), dip tips of filled berries, and let set on parchment.
8. Storage & Reheating
Since these are *no-bake* and *frozen*, reheating isn’t needed—but proper storage is key:
- Fridge: Store in an airtight container, layered with parchment to prevent sticking, for up to 3 days. The filling may soften slightly—but never become runny if frozen correctly.
- Freezer: Up to 2 weeks. Thaw in fridge for 30 minutes before serving for the perfect creamy-chewy texture.
- Do not refreeze: Once thawed, the structure breaks down. Make fresh batches if in doubt.
9. FAQ
Can I make these ahead of time?
Yes—but fill them no more than 4 hours before serving. Prep everything else (hollowing berries, making filling) the night before, store separately in fridge, then assemble fresh.
Why did my filling turn grainy?
Two common culprits: 1) Using cold cream cheese—always let it sit 2 hours at room temp before mixing, and 2) Overmixing the whipped cream into the cream cheese base. Fold *gently* until *just* combined.
My strawberries leaked—what went wrong?
Moisture is the issue. Make sure berries are *completely* dry before hollowing, and pat the cavity with paper towel after coring. Also, avoid overfilling—leakage usually happens when filling expands during freezing.
Can I use pre-made whipped cream?
I don’t recommend it. Ready-to-use tub whipped cream contains stabilizers that don’t hold up well with freezing. Whipping your own (cold!) heavy cream ensures structure and richness.
10. Conclusion
These no-bake cheesecake strawberries prove that luxury doesn’t require complexity—or even heat. With just 5 pantry staples and 15 minutes of active work, you’ve got a showstopper that tastes like dessert heaven. Plus, they’re photogenic, portable, and oh-so-satisfying. Next time you’re hosting brunch or need a quick office treat, skip the oven and let these jewel-toned bites steal the show. And if you love this easy no-bake idea, be sure to explore our Dump-and-Go Smothered Pork Chops for savory nights, or the Easy Buffalo Chicken Sliders for game-day crowds. Sweet wins await—enjoy! 🍒 Print
No-Bake Cheesecake Strawberries
No-bake cheesecake strawberries are a refreshing, crowd-pleasing dessert made in minutes with just a few simple ingredients—no oven required!
- Total Time: 15 minutes plus 30 minutes chilling
- Yield: 6 servings
Ingredients
- 12 large fresh strawberries, hulled and halved (leaving bottoms intact)
- 8 oz (225g) cream cheese, softened
- 1/3 cup (75g) powdered sugar
- 1 tsp vanilla extract
- 1 cup (240ml) heavy whipping cream, chilled
- 1 tbsp lemon juice, fresh
- Powdered sugar, for dusting (optional)
Instructions
- Hull and carefully halve strawberries lengthwise, removing the flesh to create little cups—reserve the pureed flesh for another use or discard.
- In a medium bowl, beat cream cheese, powdered sugar, and vanilla until smooth and lump-free.
- In a separate bowl, whip chilled heavy cream with lemon juice until stiff peaks form.
- gently fold 1/3 of the whipped cream into the cream cheese mixture to lighten, then fold in remaining cream until fully combined.
- Using a small spoon or piping bag, fill each strawberry cup with the cheesecake mixture.
- Refrigerate for at least 30 minutes before serving. Dust with powdered sugar if desired.
Notes
- For a dairy-free version, use cashew-based cream cheese and coconut whip cream.
- Fill strawberries just before serving to prevent sogginess.
- Use superfine powdered sugar for a smoother texture and better dissolution.
- Prep Time: 15 minutes
- Cook Time: 0 minutes
- Method: No-Bake
- Cuisine: American
- Diet: Vegetarian
Nutrition
- Serving Size: 2 strawberries
- Calories: 185 Kcal
- Sugar: 12g
- Sodium: 65mg
- Fat: 15g
- Saturated Fat: 9g
- Unsaturated Fat: 5g
- Trans Fat: 0g
- Carbohydrates: 10g
- Fiber: 1g
- Protein: 3g
- Cholesterol: 50mg
