
✨ No-Bake Chocolate Raspberry Truffles 🍒🍫 — Fast, Fancy, and Perfect for Any Holiday
1. Introduction
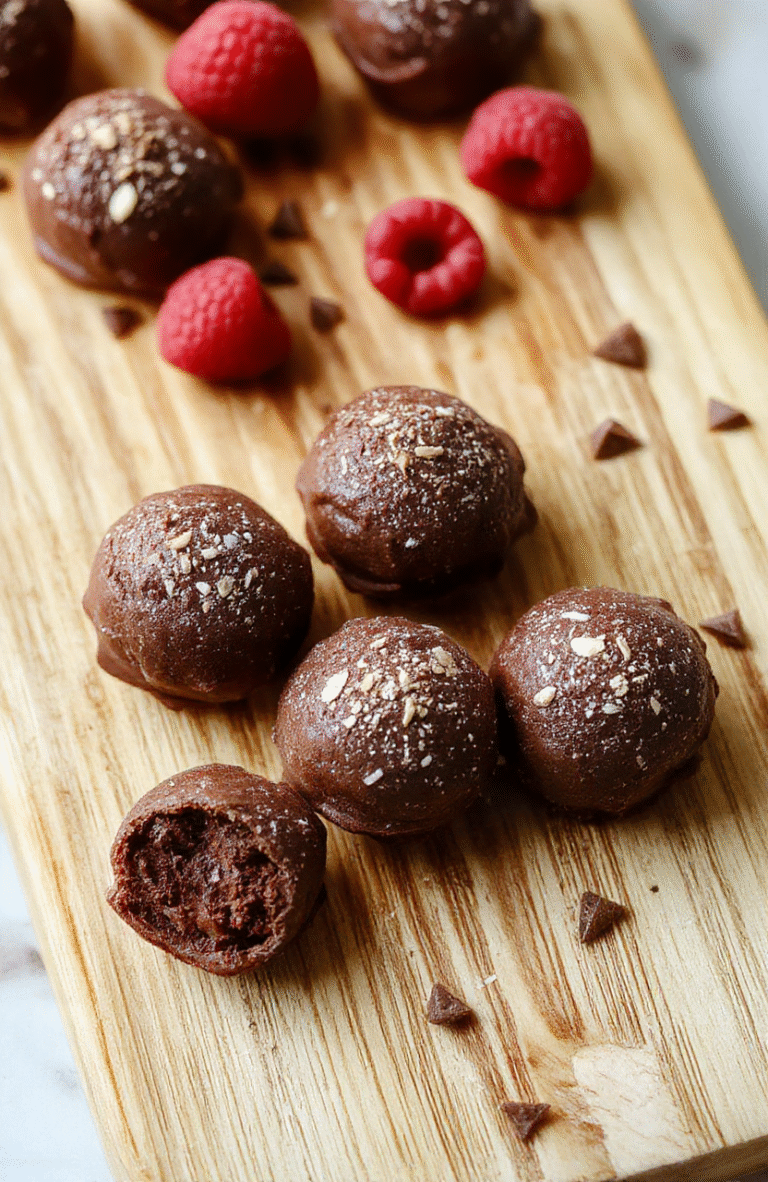
These no bake chocolate raspberry truffles are pure indulgence—without the oven heat or the stress. In just under 30 minutes, you’ll have elegant, velvety truffles enrobed in dark chocolate and filled with a luscious raspberry center that’s both tangy and sweet. Whether you’re hosting a holiday party, looking for a thoughtful homemade gift, or simply treating yourself to something special, these festive no-bake desserts deliver big on flavor and beauty. Their rich cocoa base, creamy filling, and glossy chocolate shell create a balanced bite that melts in your mouth—no baking required!
2. Why You’ll Love This Recipe
- Ready in under 30 minutes—no oven involved, so you’re free to prep other dishes.
- Only 7 simple pantry-friendly ingredients, with room to improvise.
- No baking skills needed—just mix, roll, dip, and chill.
- Guilt-free luxury: naturally sweetened with a touch of maple and rich in antioxidants from real cocoa and raspberries.
- Make-ahead friendly: store in the fridge for up to 2 weeks or freeze for 3 months.
3. Ingredient Notes
Every ingredient in these truffles plays a starring role—let me explain why the choices matter.
Dark chocolate (70% cocoa or higher) is non-negotiable for depth and richness. I recommend using a high-quality couverture or good-quality baking bars like Ghirardelli or Callebaut. The higher cocoa content gives your truffles a sophisticated, slightly bitter contrast to the sweet-tart raspberry center.
Unsalted butter (or vegan alternative) adds creaminess and helps bind the filling. If using vegan butter, make sure it’s a brand that solidifies well in the fridge—like Miyoko’s or Earth Balance.
Heavy cream (or full-fat coconut cream) creates that melt-in-your-mouth texture. Chill it well before use to prevent separation.
Frozen or freeze-dried raspberries are my go-to because they’re more concentrated in flavor than fresh ones—especially out of season. Freeze-dried berries give a bright red center with intense berry punch; frozen work well too, just make sure to drain any extra liquid well.
Maple syrup or honey balances the bitterness without adding refined sugar. Use honey for a more subtle floral sweetness or maple for deeper warmth.
4. Kitchen Tools You Need
While this recipe is intentionally simple, having the right tools makes the job smoother—and faster.
Cuisinart 2-Quart Stainless Steel Ice Cream Maker with LCD Timer isn’t just for ice cream—it’s perfect for chill-dip-coat truffles quickly! Use its chilled bowl to set your chocolate coating faster before dipping. If you often make no-bake treats, it’s a total game-changer.
Ninja SLUSHi Pro RapidChill Drink Maker isn’t just for slushies. While the name suggests beverages, its rapid chilling function chills small batches (like chocolate ganache) in under 2 minutes—ideal when you’re short on time.
Fullstar Ultimate Veggie Prep Master helps crush freeze-dried raspberries into ultra-fine powder. Just drop a handful in, pulse 2 seconds, and voilà—no lumpy, gritty centers. This little device makes prep foolproof.
For organization and precision, pair your ingredients with JoyJolt Airtight Glass Food Storage Set. Store extras of chocolate, raspberries, or dipped truffles neatly while keeping them fresh and dry—critical for glossy, smooth coatings.
5. How to Make No-Bake Chocolate Raspberry Truffles
Phase 1: Prepare the Raspberry Center
In a small bowl, combine ½ cup finely crushed freeze-dried raspberries (or thawed, drained frozen raspberries), 2 tablespoons powdered sugar, and 2 tablespoons heavy cream. Mix until smooth—this should look like bright magenta jam. Let rest 5 minutes.
Phase 2: Make the Chocolate Filling
Whisk together 6 ounces melted dark chocolate (cooled to warm, not hot), 2 tablespoons unsalted butter (melted), and 1 tablespoon maple syrup. Gently fold in ½ cup crushed digestive biscuits (or gluten-free graham crumbs). Then add ½ cup crushed freeze-dried raspberries for texture and flavor burst. Chill for 15–20 minutes until firm enough to roll.
Phase 3: Roll & Set
Using damp hands (to prevent sticking), roll the mixture into 18 uniform balls. Place on a parchment-lined tray and freeze for 20 minutes—this step is especially important for clean, glossy dipping later.
Phase 4: Temper & Dip in Chocolate
Melt 8 ounces more dark chocolate using a double boiler or microwave in 20-second bursts, stirring between each. Once glossy and smooth, cool to 88–90°F for “tempered” shine (or use the quick method: chill truffles first, then dip fast). Use a fork or chocolate dipping tool, twirl to coat, tap off excess, and return to the parchment-lined tray. Optional: sprinkle with edible gold dust or crushed freeze-dried raspberry for dramatic flair.
6. Expert Tips for Success
Here’s what separate good truffles from great ones:
- Freeze the formed balls before dipping—they won’t melt in your hands and give you a clean, round edge.
- Use a thermometer for chocolate. Overheated chocolate turns dull and streaky. 115°Fmax for melting, 88–90°F for dipping.
- Tap the baking sheet gently after placing dipped truffles—this helps release air bubbles and smooths the surface.
- Work in batches. Don’t let all your truffles sit at room temp while you dip the first batch. Keep extras冷冻ed.
- For mess-free handling, line your tray with a silicone mat like the Deluxe 33-Piece Silicone Utensil Set includes—though most sets include baking mats, too. Bonus: they’re nonstick and reusable.
7. Variations & Substitutions
Love flexibility? Try these smart swaps:
- Gluten-Free: Use almond flour cookies or oat-based graham crackers.
- Dairy-Free: Swap butter for coconut oil and use full-fat coconut cream.
- Lower Sugar: Use monk fruit sweetener in place of powdered sugar and reduce maple syrup to 2 tsp.
- Double Chocolate: Add 2 tablespoons cocoa powder to the filling and roll finished truffles in Dutch-process cocoa.
- Mini Truffle Bites: Use a ½ tsp cookie scoop for bite-sized versions—perfect for gift baskets.
8. Storage & Reheating
Refrigerator: Keep in an airtight container with parchment between layers for up to 2 weeks.
Freezer: Store up to 3 months. Thaw in the fridge for 1 hour before serving—never microwave or they’ll lose their sheen.
Bring to room temp before serving: Cold truffles taste and melt less beautifully. Let them sit for 5–10 minutes before plating.
9. FAQ
Q: Why did my truffles crack after dipping?
A: Usually from temperature shock—chocolate too hot or truffles not cold enough. Always freeze the balls first and check chocolate temperature.
Q: Can I use fresh raspberries instead of freeze-dried?
A: Not recommended for the filling—they release too much water and will make the mixture soggy. You *can* use a few fresh berries as garnish, but not in the base.
Q: My chocolate isn’t setting. What went wrong?
A> You likely didn’t temper the chocolate properly. For foolproof results, use a store-bought tempering chocolate like Guittard or Callebaut, or try the “seeding method”: add 25% chopped solid chocolate to melted chocolate and stir until combined.
Q: Can I make these vegan?
A: Definitely! Use dairy-free chocolate, coconut cream, and vegan butter. Swap maple syrup for agave if strictly vegan.
10. Conclusion
These no bake chocolate raspberry truffles are showstoppingly easy, deeply satisfying, and impressively festive—thanks to their elegant layers and vibrant color contrast. Whether you’re making them for Valentine’s Day, a winter dessert table, or a last-minute host gift, they bring joy with every bite. Pair them with a bold red wine or a cup of hot cocoa, and watch them disappear. For more crowd-pleasing no-bake options, try my Ultimate Moist Chocolate Banana Bread or those sweet and spicy honey pepper wings for savory balance. Happy truffle-making! 🍒✨ Print
No-Bake Chocolate Raspberry Truffles
- Total Time: 2 hours 20 minutes
- Yield: 24 truffles
Ingredients
- 1 ½ cups dark chocolate chips
- ½ cup heavy cream
- ¼ cup butter, softened
- 2 tbsp raspberry jam
- 1 tsp vanilla extract
- ¼ tsp salt
- 2 tbsp cocoa powder, for rolling
- Fresh raspberries for garnish (optional)
Instructions
- Line a baking sheet with parchment paper.
- Heat heavy cream in a small saucepan until just simmering. Pour over chocolate chips and let sit 2 minutes.
- Stir until smooth, then whisk in butter, vanilla, salt, and raspberry jam until fully combined.
- Refrigerate 2 hours or until firm enough to scoop.
- Use a melon.ball.or small spoon to portion into balls, then roll in cocoa powder.
- Refrigerate 15 minutes before serving. Garnish with fresh raspberries if desired.
Notes
- For vegan version, use coconut cream, vegan butter, and dairy-free chocolate.
- Store in fridge up to 1 week or freeze up to 1 month.
- Can roll in crushed pistachios or sprinkles for variety.
- Prep Time: 15 minutes
- Cook Time: 5 minutes
- Method: Refrigeration
- Cuisine: American
- Diet: Vegetarian
Nutrition
- Serving Size: 1 truffle
- Calories: 62 Kcal
- Sugar: 6g
- Sodium: 18mg
- Fat: 5g
- Saturated Fat: 3g
- Unsaturated Fat: 2g
- Trans Fat: 0g
- Carbohydrates: 5g
- Fiber: 1g
- Protein: 1g
- Cholesterol: 12mg
